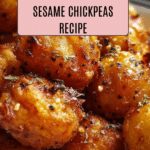
Vegan Sticky Sesame Chickpeas Recipe
Introduction
Vegan Sticky Sesame Chickpeas make a flavorful and satisfying plant-based meal. With a rich, sticky sauce and a perfectly balanced blend of sweet and savory, this dish is easy to prepare and pairs wonderfully with rice or quinoa.

Ingredients
- 1 tablespoon olive oil
- 1 small onion, finely diced
- 3 cloves garlic, minced
- 1/4 cup soy sauce or tamari for gluten-free
- 1/4 cup maple syrup
- 1 tablespoon rice vinegar
- 1 tablespoon toasted sesame oil
- 1 tablespoon cornstarch mixed with 2 tablespoons water
- 2 cups cooked chickpeas (or one 15 oz can, drained and rinsed)
- 1 tablespoon sesame seeds
- 2 green onions, sliced
- Salt and pepper to taste
- Cooked rice or quinoa, for serving
- Steamed or roasted vegetables, for serving
Instructions
- Step 1: Heat the olive oil in a large skillet over medium heat. Add the diced onion and sauté for about 3-4 minutes until translucent.
- Step 2: Add the minced garlic and sauté for another 1-2 minutes until fragrant.
- Step 3: In a small bowl, mix together the soy sauce, maple syrup, rice vinegar, and toasted sesame oil.
- Step 4: Pour the sauce mixture into the skillet with the onion and garlic, stirring well to combine.
- Step 5: Dissolve the cornstarch in water and add it into the skillet. Stir continuously until the sauce begins to thicken.
- Step 6: Add the cooked chickpeas to the skillet, stirring to coat them evenly with the sticky sesame sauce.
- Step 7: Allow the chickpeas to simmer in the sauce for about 5-7 minutes, or until they are heated through and the sauce has thickened to your desired consistency.
- Step 8: Sprinkle the sesame seeds and sliced green onions over the chickpeas. Stir to combine, then adjust salt and pepper to taste.
- Step 9: Serve the sticky sesame chickpeas over a bed of cooked rice or quinoa with steamed or roasted vegetables on the side.
Tips & Variations
- For extra flavor, toast the sesame seeds before adding them to the dish.
- Use coconut sugar instead of maple syrup for a different sweetness profile.
- Add a pinch of crushed red pepper flakes for some heat.
- Try swapping chickpeas for edamame or firm tofu for variety.
- Make it gluten-free by using tamari instead of soy sauce.
Storage
Store leftover sticky sesame chickpeas in an airtight container in the refrigerator for up to 3 days. Reheat gently in a skillet over medium heat or microwave until warmed through, adding a splash of water if the sauce has thickened too much.
How to Serve
Serve this delicious recipe with your favorite sides.
FAQs
Can I use canned chickpeas for this recipe?
Yes, canned chickpeas work perfectly. Just be sure to drain and rinse them well before cooking.
Is this recipe suitable for meal prep?
Absolutely. This dish reheats well and can be paired with freshly cooked grains and vegetables for quick lunches or dinners throughout the week.
PrintVegan Sticky Sesame Chickpeas Recipe

A delicious and easy-to-make vegan dish featuring tender chickpeas coated in a sweet and savory sticky sesame sauce. Perfectly balanced with soy sauce, maple syrup, and toasted sesame oil, this recipe is ideal for a wholesome plant-based meal served over rice or quinoa with your favorite vegetables.
- Prep Time: 10 minutes
- Cook Time: 15 minutes
- Total Time: 25 minutes
- Yield: 4 servings 1x
- Category: Main Dish
- Method: Stovetop
- Cuisine: Vegan, Asian-inspired
- Diet: Vegan
Ingredients
For the Sticky Sesame Chickpeas
- 1 tablespoon olive oil
- 1 small onion, finely diced
- 3 cloves garlic, minced
- 1/4 cup soy sauce or tamari for gluten-free
- 1/4 cup maple syrup
- 1 tablespoon rice vinegar
- 1 tablespoon toasted sesame oil
- 1 tablespoon cornstarch mixed with 2 tablespoons water
- 2 cups cooked chickpeas (or one 15 oz can, drained and rinsed)
- 1 tablespoon sesame seeds
- 2 green onions, sliced
- Salt and pepper to taste
To Serve
- Cooked rice or quinoa
- Steamed or roasted vegetables
Instructions
- Heat the olive oil: Warm the olive oil in a large skillet over medium heat. Add the finely diced onion and sauté for 3-4 minutes, until the onion becomes translucent and soft.
- Sauté garlic: Add the minced garlic to the skillet and continue sautéing for another 1-2 minutes until the garlic is fragrant but not browned.
- Prepare the sauce: In a small bowl, combine the soy sauce (or tamari), maple syrup, rice vinegar, and toasted sesame oil. Mix well to blend the flavors.
- Add the sauce to the skillet: Pour the sauce mixture into the skillet with the onions and garlic, stirring well to incorporate all the ingredients evenly.
- Thicken the sauce: Dissolve the cornstarch in 2 tablespoons of water and add this mixture to the skillet. Stir continuously until the sauce starts to thicken and become glossy.
- Add chickpeas: Stir in the cooked chickpeas, coating them thoroughly with the sticky sesame sauce.
- Simmer: Allow the chickpeas to simmer gently for 5-7 minutes, letting the sauce reduce further and the chickpeas heat completely.
- Finish with toppings: Sprinkle the sesame seeds and sliced green onions over the chickpeas. Stir well, then season with salt and pepper to taste.
- Serve: Dish the sticky sesame chickpeas over cooked rice or quinoa, accompanied by steamed or roasted vegetables for a complete, nutritious meal.
Notes
- For gluten-free, use tamari instead of soy sauce.
- Adjust the maple syrup quantity for desired sweetness.
- Use canned chickpeas for convenience; just make sure to rinse and drain them well.
- Add chili flakes if you want a spicy kick.
- Sesame seeds can be toasted lightly for extra flavor.
- Leftovers keep well in the refrigerator for up to 3 days.
Keywords: vegan chickpeas recipe, sticky sesame chickpeas, plant-based dinner, easy vegan main course, chickpea stir-fry, sesame sauce vegan, gluten-free vegan recipe